Purpose of using Cursors in SQL server


A database cursor is similar to the cursor on a word processor screen. As you press the down arrow key, the cursor scrolls down through the text one line at a time. Pressing the Up Arrow key scrolls your cursor up one line at a time. Pressing other keys such as Page Up and Page Down results in a leap of several lines in  either direction. Database cursors operate in the same way.

Database cursors enable you to select a group of data, scroll through the group of records(often called a recordset), and example each individual line of data as the cursor points to it. You can use a combination of local variables and a cursor to individually examine each record and perform any external operations needed before moving on to the next record.yo

One other common use of cursors is to save a query's results for later use. A cursor's result set is created from the result set of a SELECT query. If your application or procedure requires the repeated use of a set of records, it is faster to create a cursor once and reuse it several times than to repeatedly query the database.

Follow these steps to create, use, and close a database cursor:
  1. Create the cursor.
  2. Open the cursor for use within the procedure or application.
  3. Fetch a record's data one row at a time until you have reached the end of the cursor's records.
  4. Close the cursor when you are finished with it.
  5. Deallocate the cursor to completely discard it.

Creating a Cursor

To create a cursor using Transact-SQL, issue the following syntax:


DECLARE CURSOR_NAME CURSOR
    FOR SELECT_STATEMENT
   [FOR{READ ONLY | UPDATE [OF COLUMN_NAME_LIST]}]

By executing the declare cursor_name CURSOR statement, you have defined the cursor result set that will be used for all your cursor operations. A cursor has two important parts: the cursor result set and the cursor position.

The following statement creates a cursor based on the ARTISTS table:
DECLARE ARTISTS_CURSOR CURSOR
FOR SELECT * FROM ARTISTS
GO

You now have a simple cursor object named Artists_Cursor that contains all the records in the ARTISTS table. But first you must open the cursor.

Opening a Cursor

The simple command to open a cursor for use is,
OPEN CURSOR_NAME

Executing the following statement opens  Artists_Cursor for use:

OPEN ARTISTS_CURSOR
GO

Now you can use the cursor to scroll through the result set.

Scrolling a Cursor

To scroll the cursors result set, Transact-SQL provides the following FETCH command:
FETCH CURSOR_NAME [INTO FETCH_TARGET_LIST]

Each time the FETCH command is executed, the cursor pointer advances through the result set one row at a time. If desired, data from each row can be fetched into the FETCH_TARGET_LIST variables.
The following statements fetch the data from the Artists_Cursor result set and return the data to the program variables:

DECLARE @NAME VARCHAR(250)
DECLARE @STYLE VARCHAR(150)
DECLARE @ARTISTS_ID INT
FETCH ARTISTS_CURSOR INTO @NAME, @STYLE, @ARTISTS_ID
PRINT @NAME
PRINT @STYLE
PRINT CHAR(@ARTISTS_ID)
GO
You can use WHILE loop to loop through the entire result set. But how do you know when you have reached the end of the records?

Testing a Cursors Status

Transact-SQL enables you to check the status of the cursor at any time through the maintenance of two global variables: @@FETCH_STATUS and @@ROWCOUNT. This variable contains one of three values.

Status - 0: Successful completion of the FETCH statement.
Status - 1: The FETCH statement resulted in an error.
Status - 2: There is no more data in the result set.


DECLARE @NAME VARCHAR(250)
DECLARE @STYLE VARCHAR(150)
DECLARE @ARTISTS_ID INT
FETCH ARTISTS_CURSOR INTO @NAME, @STYLE, @ARTISTS_ID
WHILE(@@FETCH_STATUS=0)
BEGIN
PRINT @NAME
PRINT @STYLE
PRINT CHAR(@ARTISTS_ID)
FETCH ARTISTS_CURSOR INTO @NAME, @STYLE, @ARTISTS_ID
END 
GO

Now you have a fully functioning cursor! The only step left is to close the cursor.

Closing a Cursor

Closing a cursor is very simple. The statement to close a cursor is as follows:

close cursor_name

This cursor still exists. however, it must be reopened. Closing a cursor essentially closes out its result set, not its entire existence. When you are completely finished with a cursor, the DEALLOCATE command frees the memory associated with a cursor and frees the cursor name for reuse. The DEALLOCATE statement syntax is as follows:

DEALLOCATE CURSOR_NAME

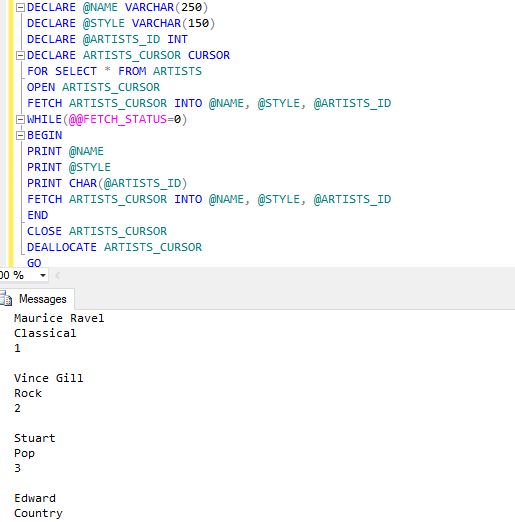
You can use the following example for complete process of creating a cursor,

Examples:
DECLARE @NAME VARCHAR(250)
DECLARE @STYLE VARCHAR(150)
DECLARE @ARTISTS_ID INT
DECLARE ARTISTS_CURSOR CURSOR
FOR SELECT * FROM ARTISTS
OPEN ARTISTS_CURSOR
FETCH ARTISTS_CURSOR INTO @NAME, @STYLE, @ARTISTS_ID
WHILE(@@FETCH_STATUS=0)
BEGIN
PRINT @NAME
PRINT @STYLE
PRINT CHAR(@ARTISTS_ID)
FETCH ARTISTS_CURSOR INTO @NAME, @STYLE, @ARTISTS_ID
END 
CLOSE ARTISTS_CURSOR
DEALLOCATE ARTISTS_CURSOR
GO

Result:

Comments

Popular posts from this blog

FORCE ORDER in SQL Server

The FORCE ORDER is a query hint it executes the order of the tables exactly specified in a statement. When we use this query hint in a statement it will tell SQL server not to change the order of the joins in the query. Basically, the SQL server rearrange your joins to be in the order that it thinks it will be optimal for your query to execute. Now, Lets see the execution plan without the FORCE ORDER: The above execution plan demonstrates the optimal order of the joins returned by the SQL server. As you can see the order starts from the sales details and goes by bank details to employee details. Suppose if you don't want the SQL server to change the order of the joins in a query you can use FORCE ORDER to stop the default ordering. The syntax for FORCE ORDER query hint is, OPTION ( FORCE ORDER ); Now, Lets see the execution plan with the FORCE ORDER: select * from tbl_EmployeeDetails as e inner join tbl_BankDetails as b on e.Id=b.EmpID inner join tbl_S

How to create comma separated values in SQL server?

Comma Separated Values in SQL Predominantly in reporting, you may gone through a situation where you need to convert a comma separated values into list of rows or to convert a list of rows into single column to display in a report. In this splash reading, you will understand the following: How to convert comma separated data in a column to multiple rows How to convert multiple rows into one comma separated values Using COALESCE function Using STUFF function Convert comma separated data in a column to multiple rows Here we have an Customer table with a list of products bought by each customer, ID CUSTOMER PRODUCTS 1 Stuart Chain Saw,Circular Saw 2 Michael Drill,Hammer 3 Jonathan Sticky Notes,Mouse 4 Nabeel Mobile,Headset Suppose you want to return this as a single table, list of products bought by each customer. we need to create a function that splits our comma separated col

OPTION (MERGE JOIN) in SQL Server

OPTION (MERGE JOIN) in SQL Server The MERGE JOIN query hint is a best available join algorithm in SQL server. It is based on first sorting  both data sets according to the join conditions and then traversing through the sorted data sets and finding matches. The MERGE JOIN itself is very fast, but it can be an expensive choice if sort operations are required. This produces the best optimal execution plan. The syntax is, OPTION ( MERGE JOIN ); Now, Lets see how to use MERGE JOIN with SELECT statement.? select * from tbl_EmployeeDetails as e inner join tbl_BankDetails as b on b.EmpId=e.Id OPTION(MERGE JOIN); The statement returned optimal execution plan is, The MERGE JOIN operator gets a row from each input and compares them. In above statement, it merges all joins and first sorting data sets and then traversing through the sorted data sets and finding matches, if they are equal the rows are returned. If they are not equal, the lower-value row is removed

How to manipulate JSON data in SQL server?

Manipulate JSON data in SQL Server JavaScript Object Notation (JSON) is a lightweight popular data exchangeable format used across modern IoT platforms, web and mobile applications etc. It is a language independent textual data format. JavaScript Object Notation (JSON) is also used for storing unstructured data in log files or NoSQL Databases such as Microsoft Azure Cosmos DB. Many RESTful web services that allow us to store and retrieve JSON formatted texts among different protocols using different Endpoints. The example of JSON text is as follows, [{         "customer":"Michael",         "products":["Watch","Mobile","Books"] }, {         "customer":"Stuart",         "products":["Laptop","Keyboard","Mouse"] } ] In this article you will understand the following, Read JSON data from table Modify JSON data in a table Validate JSON objects 

OPTION Loop Join in SQL Server

The OPTION ( LOOP JOIN ) would enforce LOOP JOIN across all joins in the query. Using the OPTION ( LOOP JOIN ) appears to allows the query optimizer to join the tables using the nested loops in which ever order SQL server decides it is optimal. The OPTION clause must be a last clause in a statement. The syntax is, OPTION ( LOOP JOIN ); Now, Lets see how to use LOOP JOIN with SELECT statement.? select *from tbl_EmployeeDetails as e inner join tbl_BankDetails as b on b.EmpID=e.Id inner join tbl_SalesDetails as s on s.BankId=b.Id OPTION(LOOP JOIN); The statement returned execution plan is, The above statement loops through all the joins that starts from sales details and goes by bank details to employee details in which the order that SQL server thinks it is optimal. This does not follow the order of joins that we specify. Suppose, if you want the SQL server to follow the order of joins that you specify you have to use FORCE ORDER in OPTION clause. Howe